
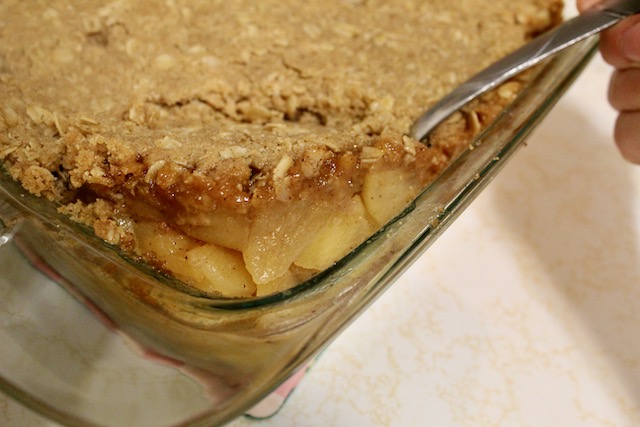
Apple crisp is the perfect fall dessert. By combining the sweet and tart, crunchy and chewy, and all the other good flavors that are brought together in this fall treat, who can really resist a tasty apple crisp recipe? Apples are one of the mascots of fall, and this recipe is one of the best. With the apples of your choice, and a little extra crisp topping of course, I think this recipe combines the best things about autumn. If you love a classic fall dessert, then you are going to love the best apple crisp recipe ever.

Apples are one of my favorite things about fall. My grandfather had a large apple orchard in his backyard, and I remember his love for those trees and their fruit. Growing up, he would give my family a lot of fruit in the fall, and we would make apple cider, apple sauce, and apple pie filling to can, preserve, and eat. Often my mom would even slice them up to dry in the dehydrator, and we would have them for snacks all throughout the year. These memories and so many more make the apple such a special fruit.
One of the best things about apples is just how versatile they are! You can use every part of them to make something. They pair well with savory items and sweet, and you can even use the scraps to make vinegar if you want. I love that you can use so much of this fruit without wasting anything. However, I think one of my favorite ways to eat the apple is in an apple crisp.

Apple crisps are such a delicious dessert, and I love just how simple of an idea they are. Really, a crisp is a dessert that takes very little skill to create. The filling is made by peeling, coring, and slicing the apples, and then you simple mix them with the rest of the filling ingredients. The topping is just as simple. Throw everything in a bowl and use your hands to mix together. The most difficult piece is actually waiting for the crisp to cook since you can smell it throughout the house while it is still in the oven.
If you have never made a crisp before, don’t be too intimidated to try this recipe. It is one of the best because it easily combines simple ingredients with simple directions, but the results are absolutely delicious.

Because my husband and I love an apple crisp with thick topping, I have made my topping a bit thicker than other recipes I have tried. I love having a good bite with plenty of apple and topping together to get the complimentary flavors in one mouthful. If you pair it with a scoop of vanilla ice cream or some whipped cream, each bite is even better.
Want new recipes straight to your inbox? Sign up below!
Does apple crisp need to be refrigerated?
While it is not necessary to refrigerate baked apple crisp, I do recommend it. I have found that my crisp retains a better flavor and texture when I cover it and keep it in the fridge. You should be able to keep it in the fridge for up to three days without it going bad.
What apples are best for apple crisp?
The apples that are best for apple crisp will vary depending on what flavor and texture you desire for your filling. Generally, people agree that Granny Smith apples are a great choice for apple crisps and apple pies, but I also love to use a mixture sometimes as Granny Smith apples can be very tart. I recommend trying a mixture that includes at least a couple different types of apples if you are unsure of how tart or sweet you like your apple crisp.
Why was my apple crisp watery?
The reason you might have a watery apple crisp has to do with the amount of juice that is in the apples themselves. If you have very juicy apples, you are more likely to have a watery filling. To avoid this, you can precook the filling on low in a pot on the stove before adding it to the baking pan. This should help you cook out some of the juice before baking with the topping on.

Ingredients
Filling:
- Apples
- Brown Sugar
- Melted Butter
- Lemon Juice
- Cinnamon
Topping:
- All-purpose Flour
- Old-Fashioned Oats
- Brown Sugar
- Granulated Sugar
- Salt
- Cinnamon
- Cold Butter
How to Make Apple Crisp:

Start off by peeling, coring, and chopping the apple up into 1/8 to 1/4 inch slices. This will allow them cook evenly and be easy to bite into.

Place the slices into a large bowl (or you can be like me and put them straight into the baking dish). Add the rest of the filling ingredients. Mix until evenly incorporated, and pour into the baking dish. (If you are mixing in the baking dish, you will need to go slow and use a large spoon to get into the corners.)

In another medium sized bowl, add all of the ingredients except the cold butter to the dish. Mix with your hands or a whisk. Then add the cold butter cut up in chunks, and use your hands to knead in the butter. (You could do this with a fork if you wanted, but I find that my hands actually work better and faster.)

Once your topping has the texture of sand or small pebbles, you can pour it over the top of the apples and pat it into a flat even surface. You will want to make sure that all of the apples are covered to avoid them drying out in the oven.
Bake in a preheated oven at 350 degrees for 30-35 minutes. The crisp is done when the apples are soft and the edges are lightly browned.

Once done, you will want to let the crisp sit for a few minutes to help the filling thicken up and to let it cool before eating. Then you can dish it up, and serve with vanilla ice cream, whipped cream, or just by itself. Enjoy!
Best Apple Crisp Recipe
Filling:
- 7-8 Med.-Lg. Apples
- 1/2 c. Brown Sugar
- 6 Tbsp. Melted Butter
- 1 Tbsp. Lemon Juice
- 1/2 tsp. Cinnamon
Topping:
- 1 c. All-purpose Flour
- 1 c. Old-Fashioned Oats
- 1/2 c. Brown Sugar
- 1/4 c. Granulated Sugar
- Pinch of Salt
- 1 1/2 tsp. Cinnamon
- 1/2 c. Cold Butter
- Start off by peeling, coring, and chopping the apple up into 1/8 to 1/4 inch slices. This will allow them cook evenly and be easy to bite into.
- Place the slices into a large bowl (or you can be like me and put them straight into the baking dish). Add the rest of the filling ingredients. Mix until evenly incorporated, and pour into the baking dish. (If you are mixing in the baking dish, you will need to go slow and use a large spoon to get into the corners.)
- In another medium sized bowl, add all of the ingredients except the cold butter to the dish. Mix with your hands or a whisk. Then add the cold butter cut up in chunks, and use your hands to knead in the butter. (You could do this with a fork if you wanted, but I find that my hands actually work better and faster.)
- Once your topping has the texture of sand or small pebbles, you can pour it over the top of the apples and pat it into a flat even surface. You will want to make sure that all of the apples are covered to avoid them drying out in the oven.
- Bake in a preheated oven at 350 degrees for 30-35 minutes. The crisp is done when the apples are soft and the edges are lightly browned.
- Once done, you will want to let the crisp sit for a few minutes to help the filling thicken up and to let it cool before eating. Then you can dish it up, and serve with vanilla ice cream, whipped cream, or just by itself. Enjoy!
I hope you enjoyed this blog post! Please like and subscribe to my blog if you would like to see more content like this, and share with others! If you want to keep up with me on Instagram or Facebook, you can find me @godsgiftofcreativity on either platform.
Thanks for creating with me!
-Chelsey
Hi there! I’m Chelsey!
Welcome to my blog God’s Gift of Creativity! Join me as I share my love for crochet, crafts, and cooking and show you how you can do it too!


Leave a Reply